Final Installation Guide
Hardware Version: Pilot
Hardware installation of a preassembled or diy assembled Stringman robot.
Tools needed:
- Step ladder
- Handheld drill/driver
Expected Difficulty:
- Takes 1 hour without interruptions
- Like hanging a curtain rod, plus at least 30 minutes for additional setup.
Hanging the robot in the room where it will operate involves installing an anchor in each corner, and attaching each of the four support lines to the gantry. Power is delivered to the gripper by plugging in the jst connector at the end of the power anchor's line.
Anchor installation
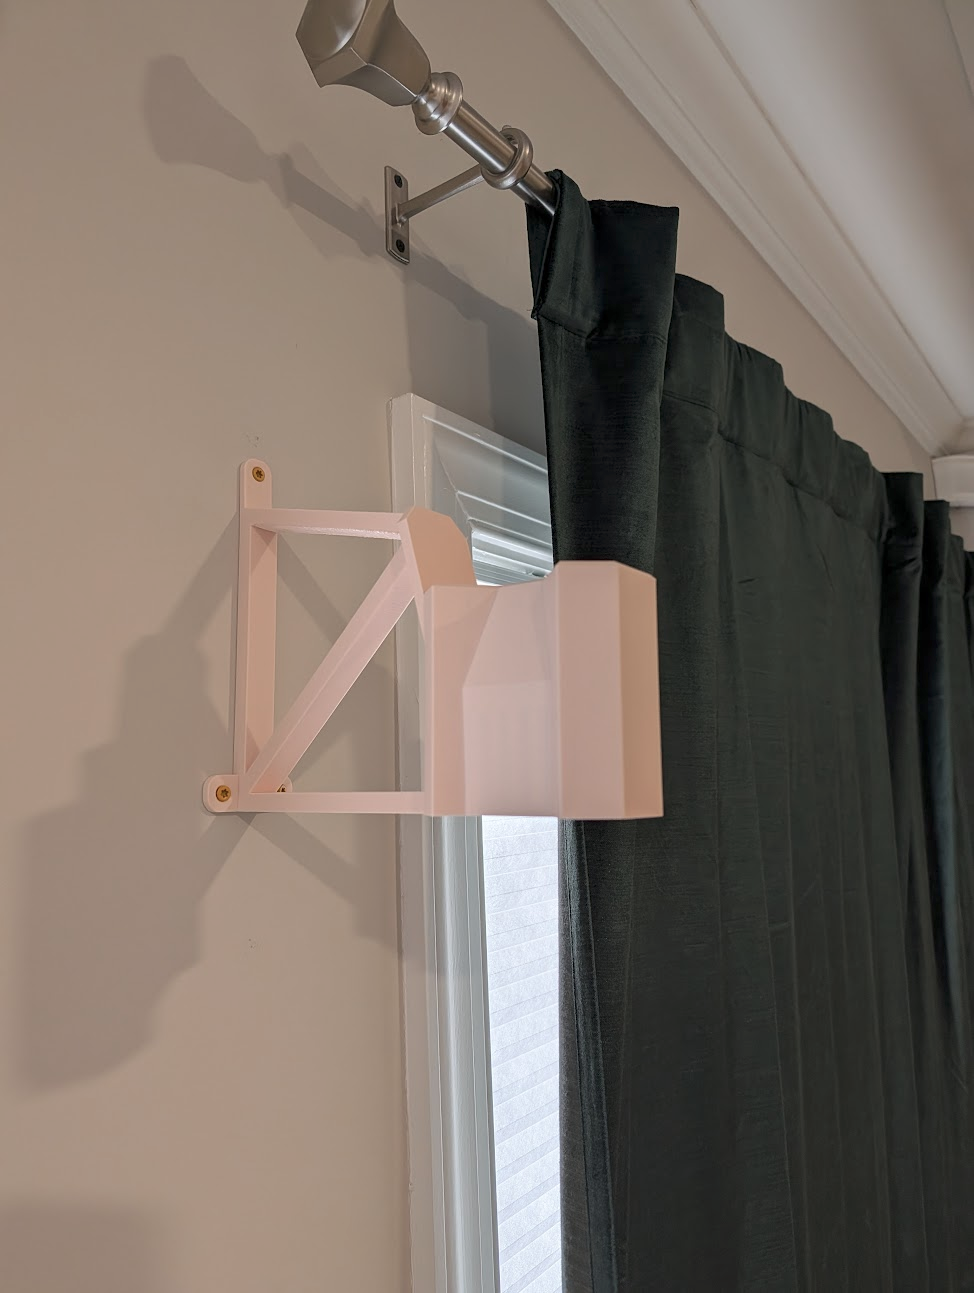
You will have received or assembled corner or flat anchor variants appropriate your space. Installation only differs in how they look and where the screws are.
Remove the anchor's white cover by unscrewing the silver screw on the bottom if it is present, you can back it halfway out. The pull up on the large flat face to release the tabs, then pull it straight off the front. Another way if it feels stuck is, after getting the tabs loose, hold the cover and give the whole thing one large shake so the anchor falls in your lap and you're holding the empty cover.
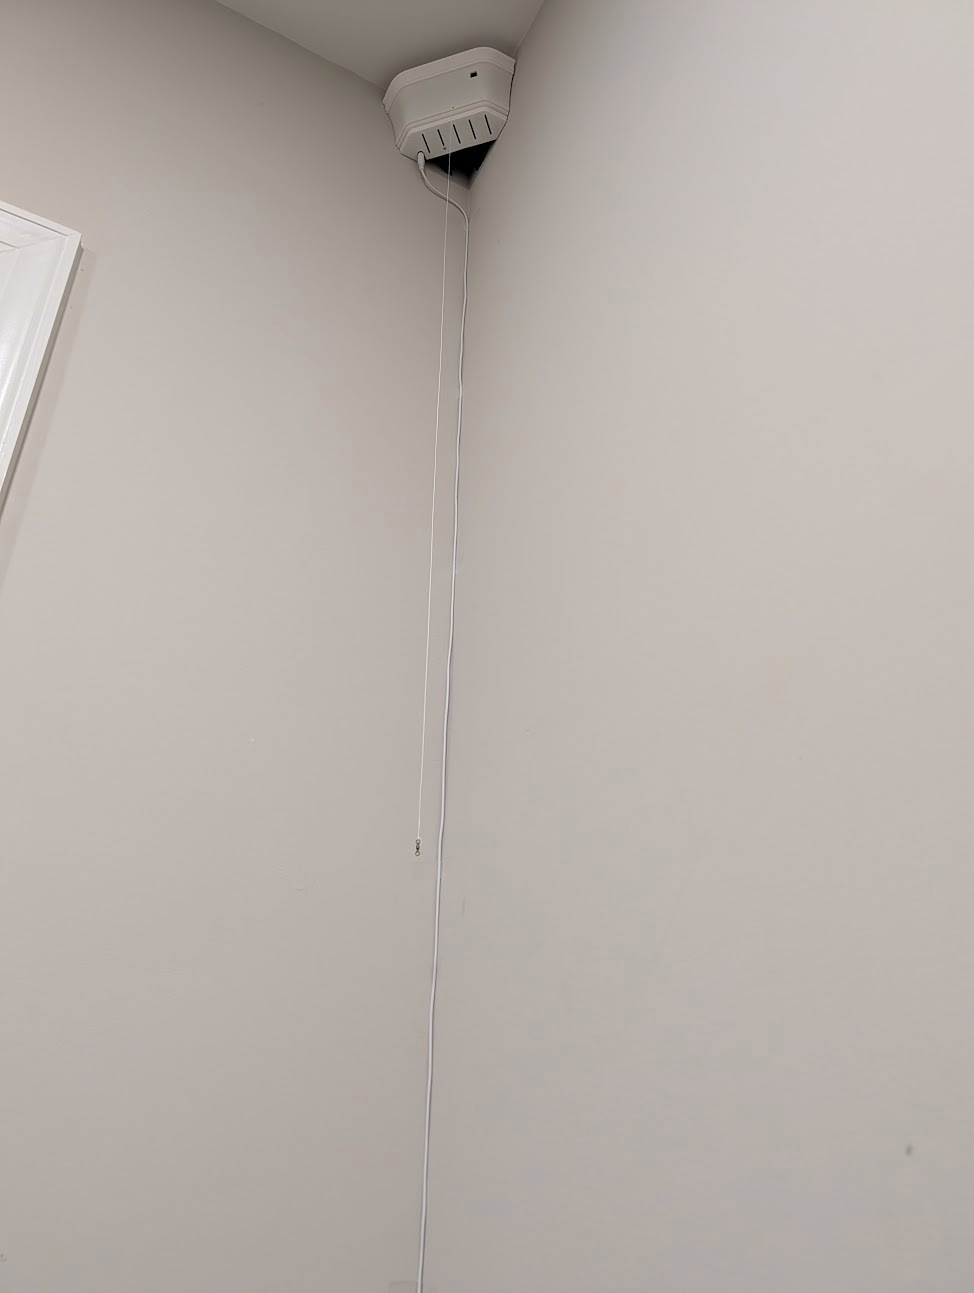
The cover would be prevented from falling because the line or wire is threaded through the face hole with a fishing swivel tied on the other side, however letting in hang by the clicky switch might bend it's metal arm, so instead of doing that, pull out enough slack that you can place the cover on your step ladder without any pressure on the switch.

There are three screw holes in each anchor for mouting it to the wall. Use only the two indicated in the following image. Partially install the wood screws into the holes in every anchor until the point just protrudes from the back.

Skip the third hole
The line tightness detection switch is so easy to bend that it is safer to just not install the wood screw in the hole behind it. only use that hole if the others don't hit a stud. And only with care not to damage the switch
Safely place your ladder in the corner of the room so you can reach the ceiling.
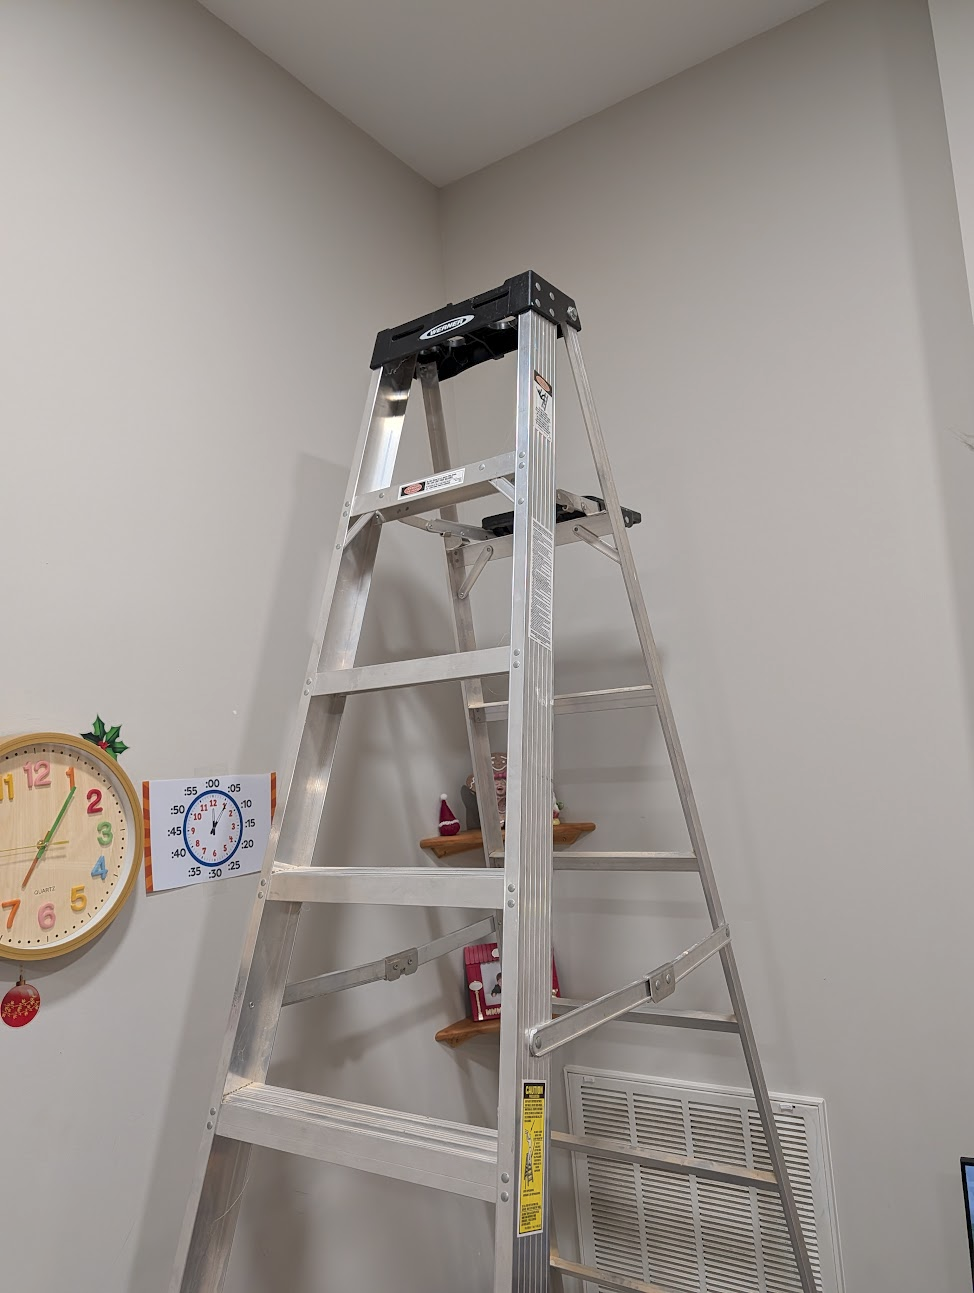
Hold the anchor securely in the corner with about 2cm of clearance to the ceiling, or to the moulding. Don't push it right up against the moulding as you need space above the top for the cover. Drive in every screw.

Note
The corners of walls in typical "stick framed" american houses will have at least one 2x4 in the corner on one side or the other. However, there are cases when two interior walls meet in a cross where the corner may be hollow. If you believe there is no stud in the corner, you either need to install a backer board connected to the nearest studs, or select a flat anchor variant for that corner and pick a nearby stud.
If you think you are in a building with steel or aluminum framing, please consult a professional. it is probably possible to bolt the anchor to the stud with the right hardware.

While holding the line tight so it can't get pinched in the body somewhere, Snap on the cover. Push it straight on hard so both tabs at the top click into place. Secure it at the bottom with an M2.5x6 screw.

When installing a flat wall anchor, confirm the camera would point towards the center of the work area.
Find a stud in the wall near the installation spot. I prefer to use neodymium magnets to locate the drywall scews.
Hold the anchor securely onto the wall with the screw holes aligned to the stud and about 2cm of clearance to the ceiling, or to the moulding. Don't push it right up against the moulding as you need space for the cover. Drive in every screw.


While holding the line tight so it can't get pinched in the body somewhere, Snap on the cover. Push it straight on hard so both tabs at the top click into place. Secure it at the bottom with an M2.5x6 screw.


Pull out enough of the line that you can reach it from the ground. If you feel bumping while pulling out line, this is normal. It is an electrical phenomenon involving the stepper driver, and it is harmless. When pulling line, confirm that the switch clicks when it's tight, and unclicks when it's loose. If you don't hear the click, especially with the power line, you may have to open the cover an slightly bend the lever arm of the switch up or down by small increments.

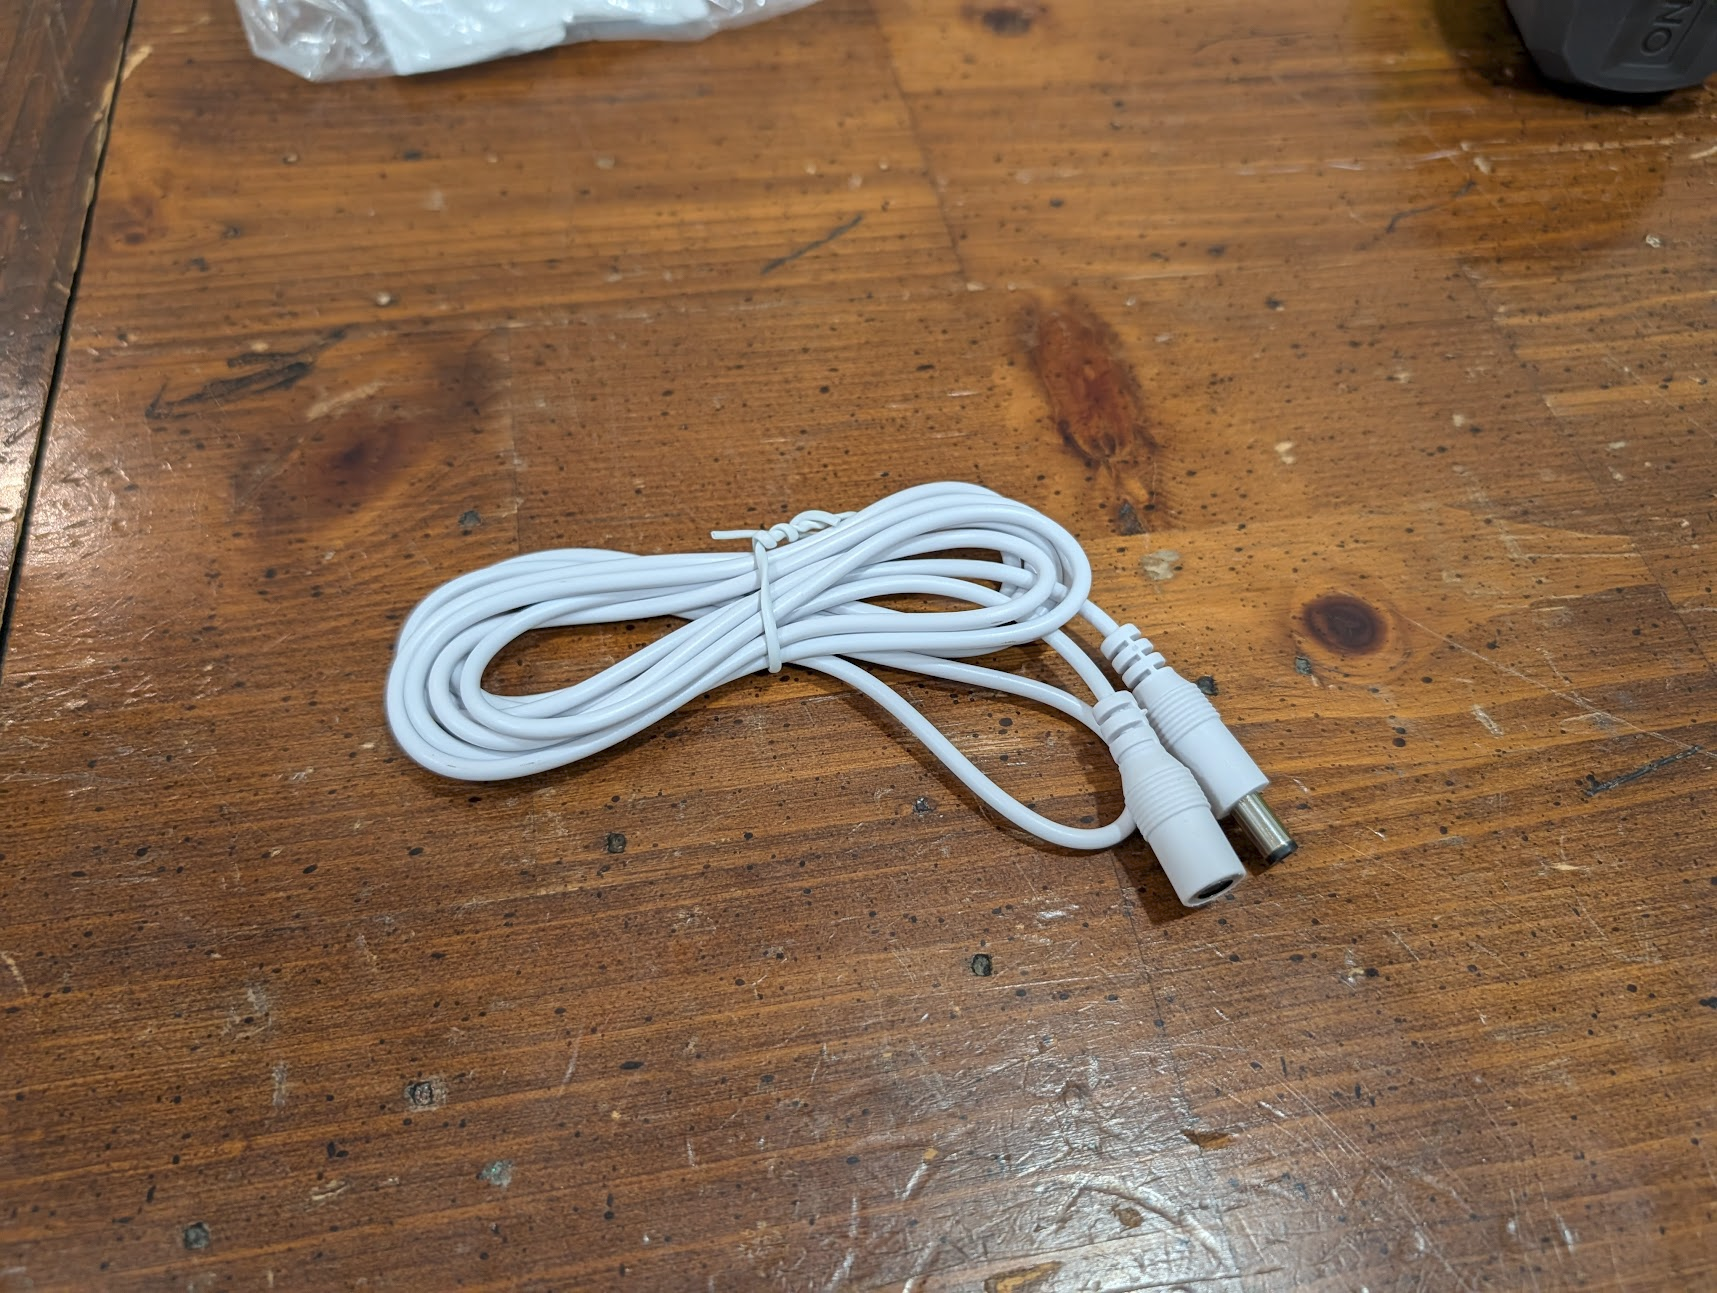
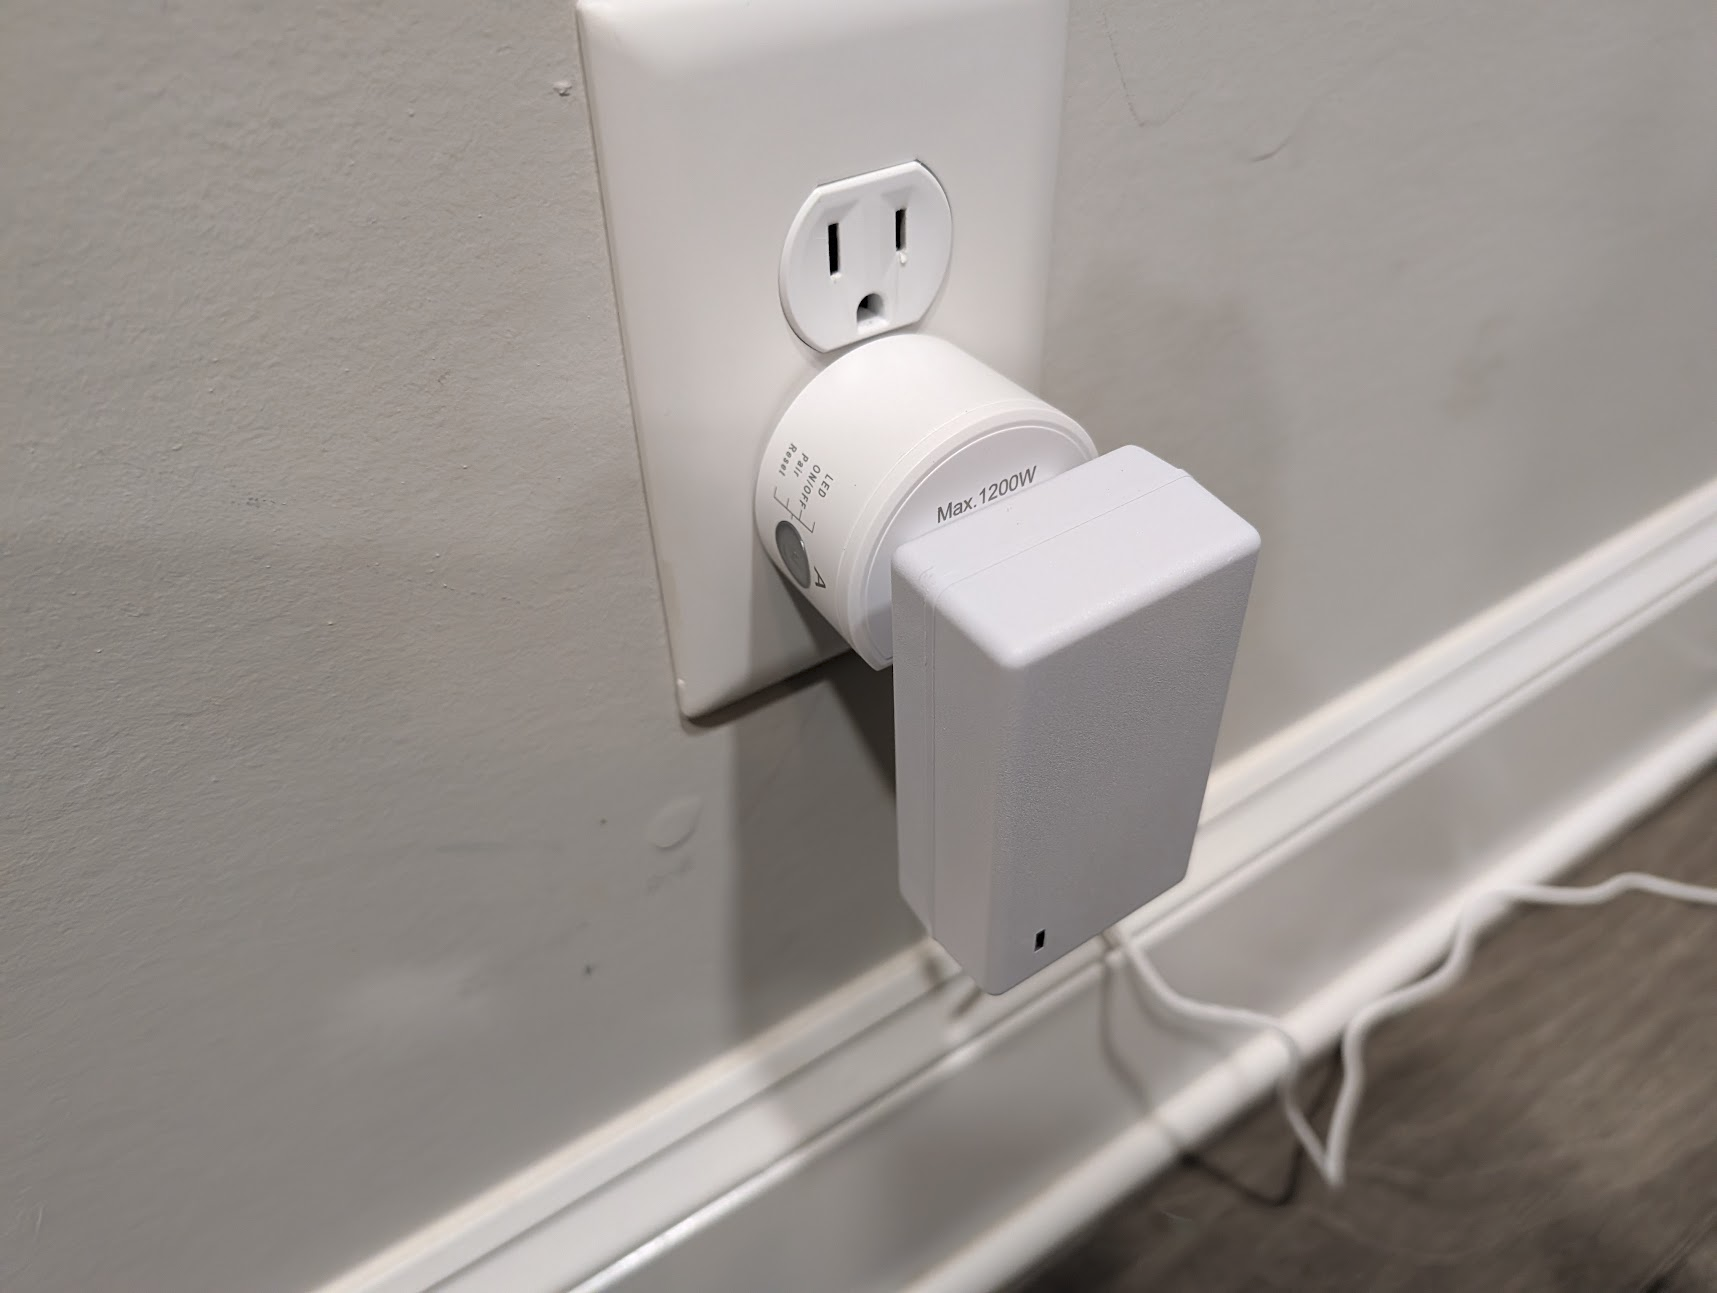
Plug the DC barrel jack extension cord into the bottom of the anchor, and the power supply into that. You can make it look nicer by taping it into the corner of the wall.
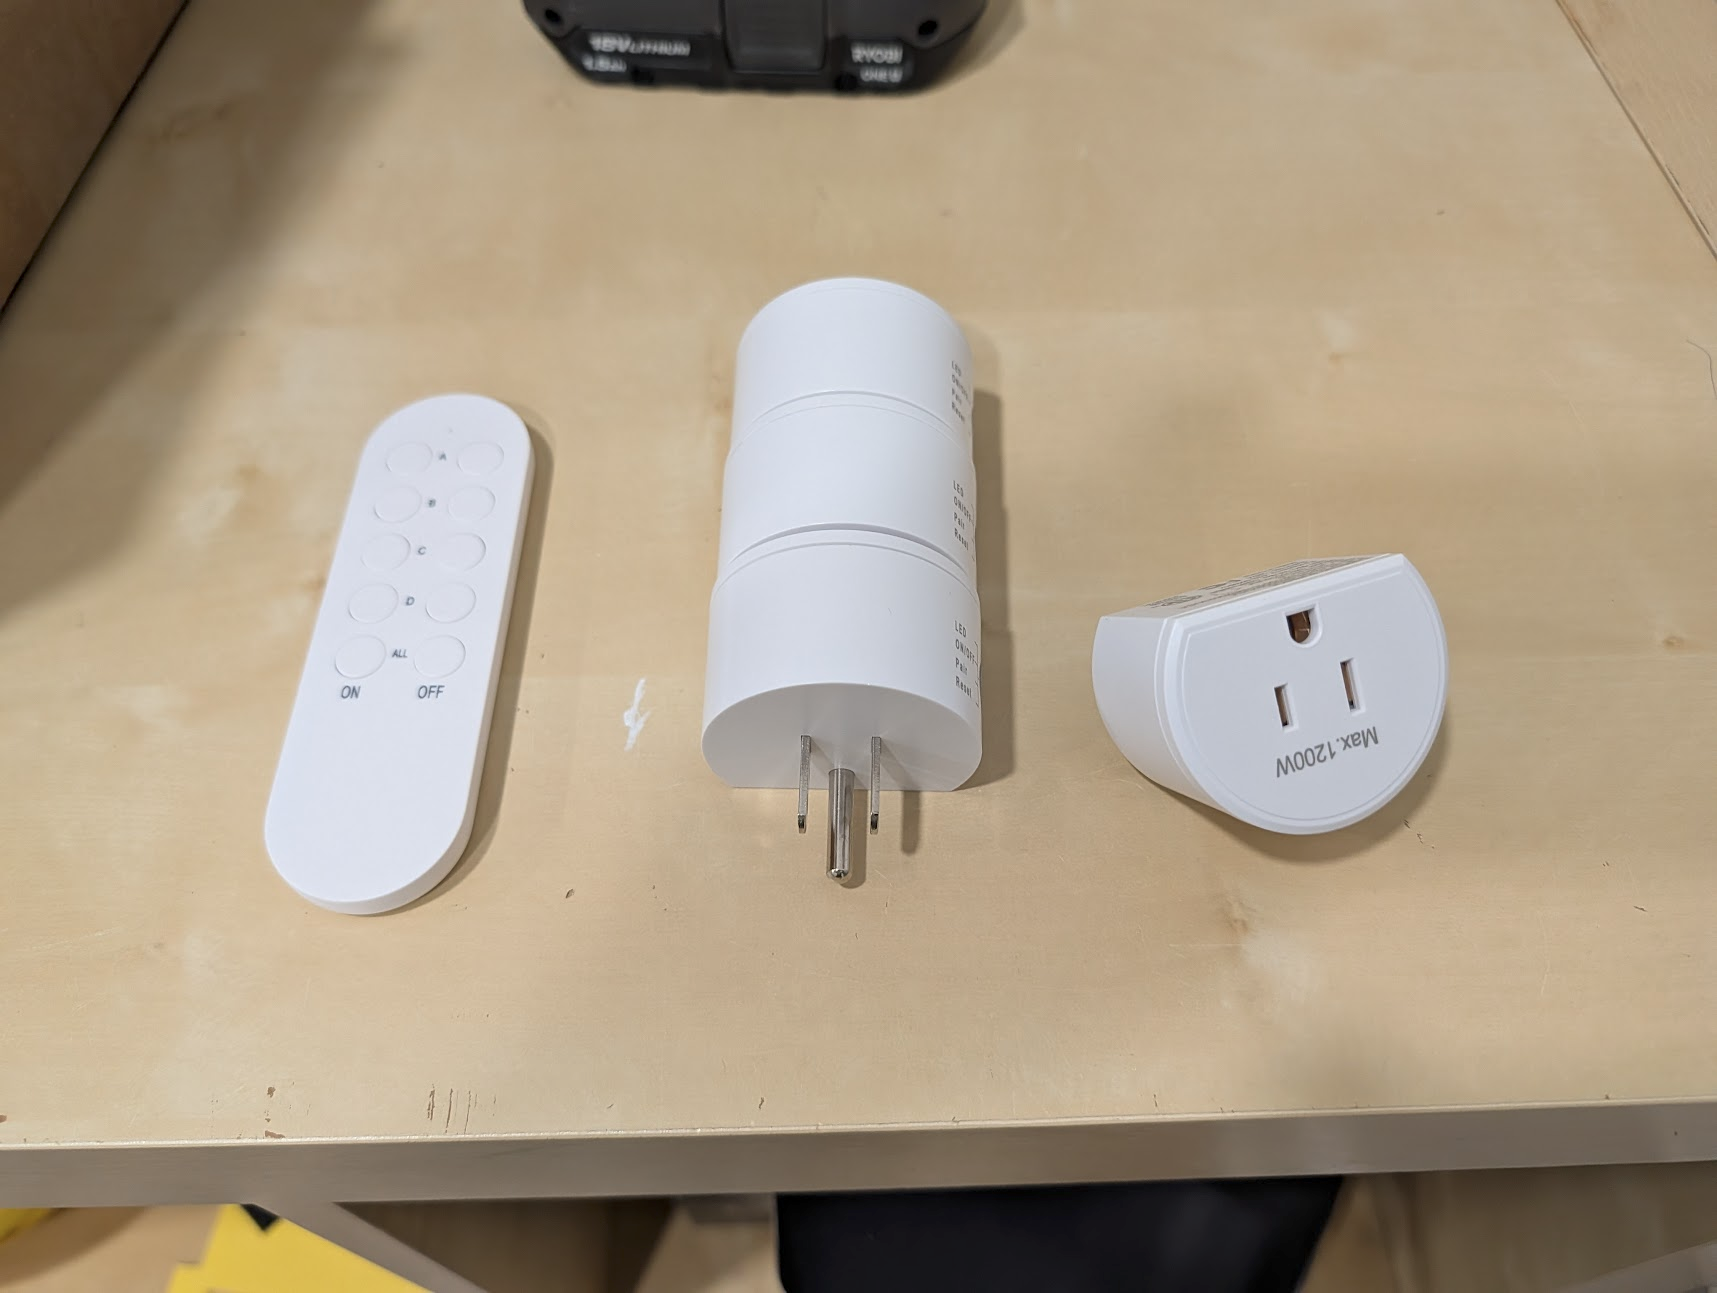
Plug in the anchor via one of the provided outlet remotes. The outlet remote serves as a low tech kill switch that's immune to software bugs, and serves as your main power on/off switch since the Pilot version has no global sleep mode.
You can now move the ladder to the next corner.
Supply temporary power to the gripper
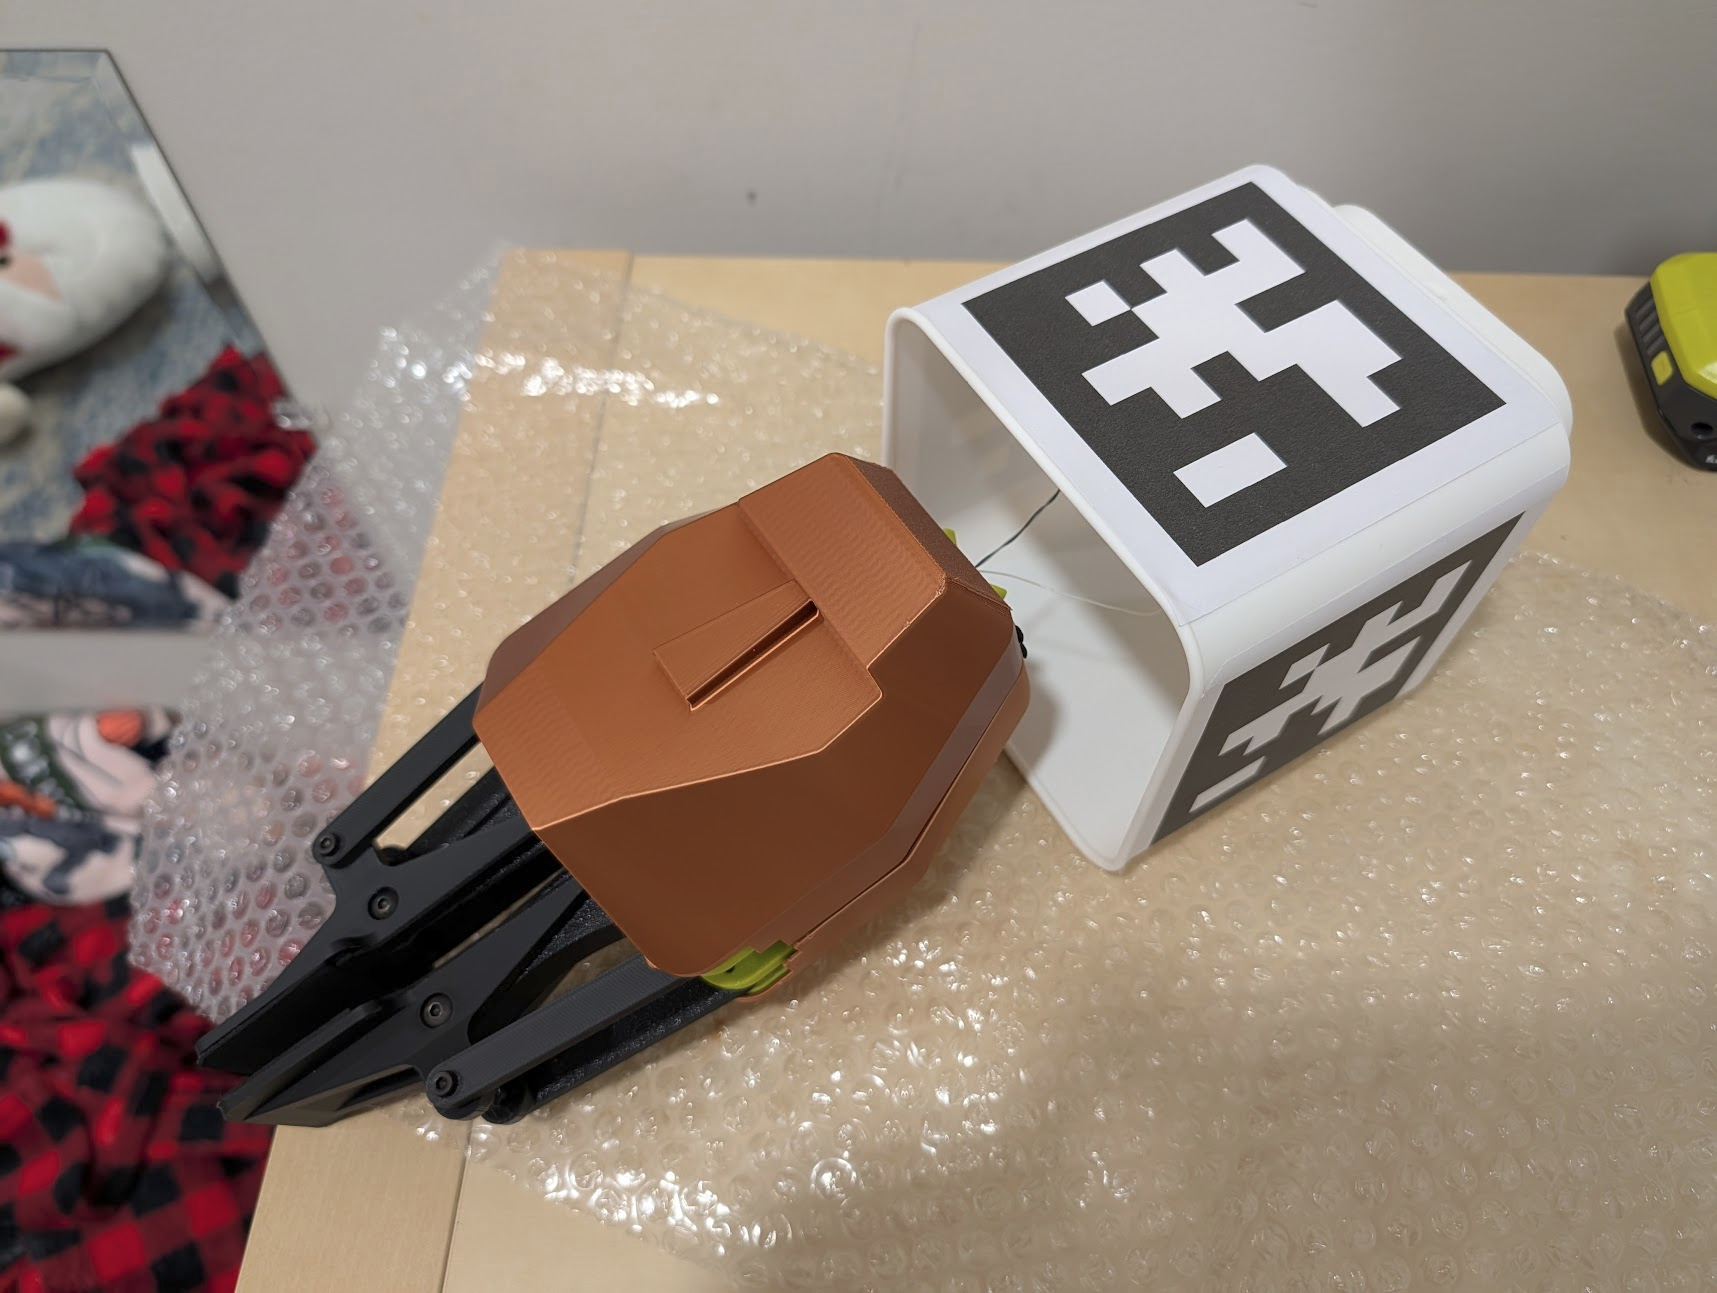
Unpack the gripper and gantry, which are attached, and place them somewhere near the anchor with the power line. pull the line out enough to reach and temporarily plug in the gripper for the connection test step.
Pre Tie-up Connection Test
Ensure the control panel can run on your host machine and connect to the robot components.
Following the instructions in the Desktop Setup Guide start up the Stringman controller. It begins searching for components on the network.
Only one complete stringman robot may be on the network during this step
In order for the controller to discover which components belong to this particula robot, If you own another stringman, turn it off.
Without having tied any of the lines to the gantry, power on all components using the outlet remote. Within about 30 seconds of booting, stringman components begin looking for a wifi share QR code using their cameras.
Give all five components wifi credentials
Go to qifi.org on your phone and enter your wifi SSID and password. It will not be saved or sent anywhere. Press Generate to create a QR code that contains this information. You can also try your phone's share wifi feature, but due to the fancy decorative QR codes produced by android, it usually doesn't work. whereas, qifi.org generates traditional blocky QR codes.
Hold the QR in view of each camera for about 10 seconds each. They can see a 2-inch code from about 5 feet away.
At this time there is neither auditory or visual feedback to indicate success, only the control panel.
Wait about 2 more minutes for connections to be made and components to be discovered. (In my testing the device appears on the network at the 60s mark if the code is shown throughout boot)
Confirm that the control panel has discovered all 5 components (four anchors and one gripper). If it has not, power everythinng off and trying repeating the process.
If this method is not working for you, wifi credentials can also be added to the SD cards with the add_wifi_config.sh script.
If you have connection issues at this step, your anchors and host machine might not be on the same network. Please refer to the Troubleshooting Page or contact me on Discord to resolve the issue before tie up.
Tie up
Close the Stringman controller and power off all components for this step.
Place the gripper and gantry on the floor in the center of the room. Pull all four lines slowly out of the anchors until their ends reach the gantry.

Thread each eyelet into the closest hole in the side of the gantry and clip it onto one of the speed clips. Do not cross lines, and select the right speed clip for each line so that they form a clean cross in the center.


When you get to the power line, pass the JST connector through the hole as well. Attach the swivel to the corresponding clip, and plug the gripper's JST connector into the socket on the end of the power line. the conductors are longer than the fishing line, making them slack so the fishing line should bear all the weight. If for some reason the conductor is bearing any weight, retie the power line's swivel back 10 cm.
Power on
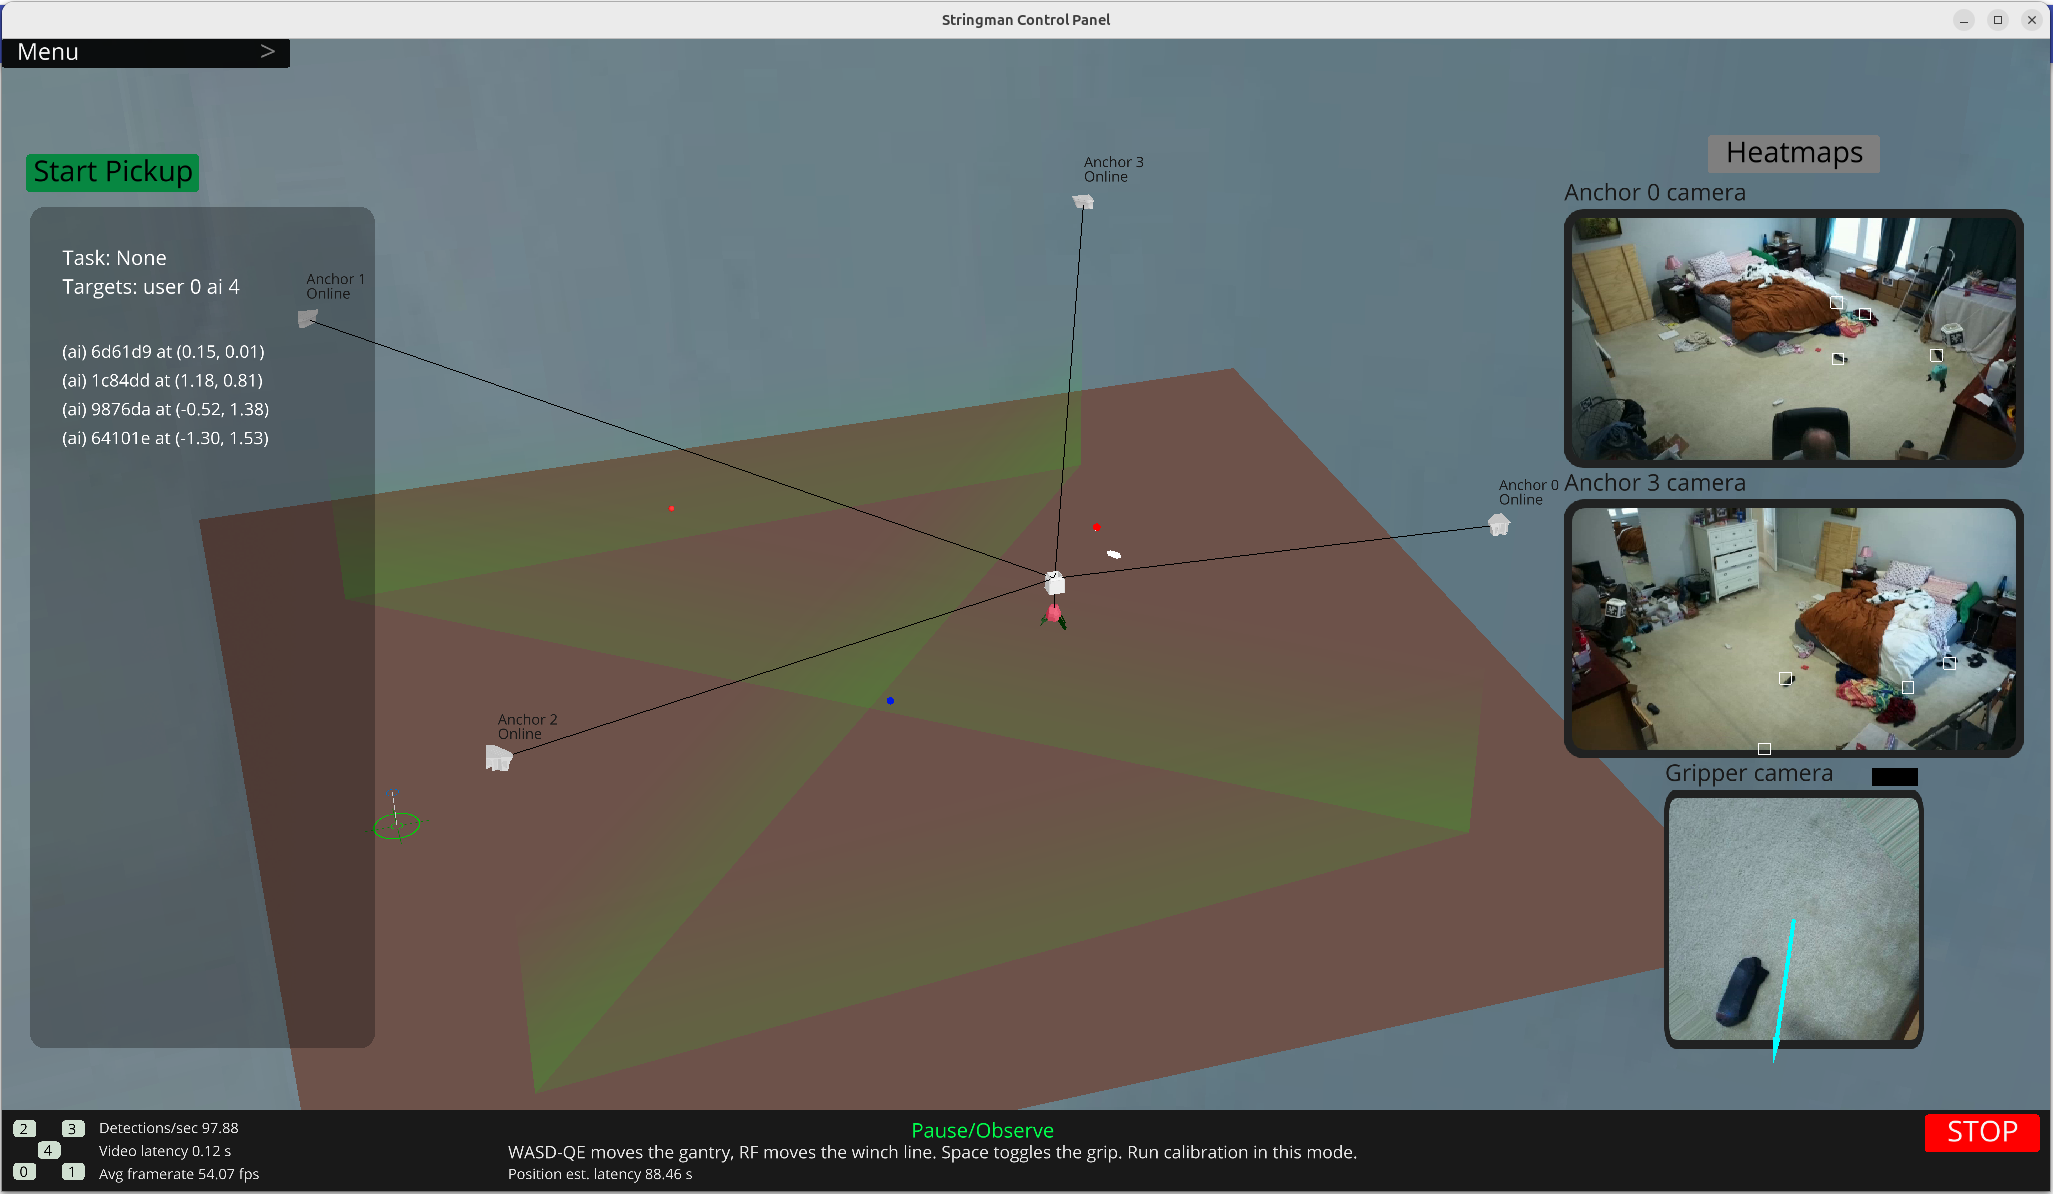
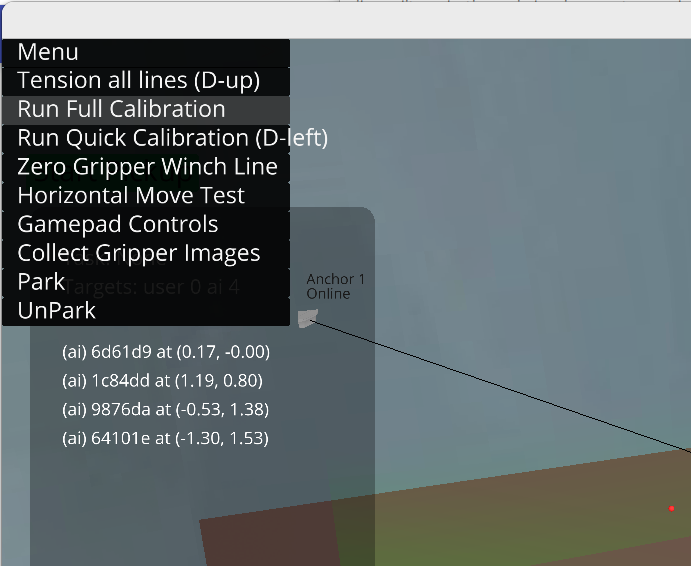
Power on all the anchors using the "all on" button on your outlet remote. the gripper's fingers may suddenly move to the neutral position, this is normal. Open the control panel. Wait for all components to be discovered, connected, and for video to come online. Select "Auto tension" from the main menu.
Lay the full page "origin" marker in the center of the room, aligned with your walls.
The gantry cube must be in view of the cameras for calibration to work. ensure you see it in the camera feeds.
Select the "Run Full Calibration" option from the main menu.
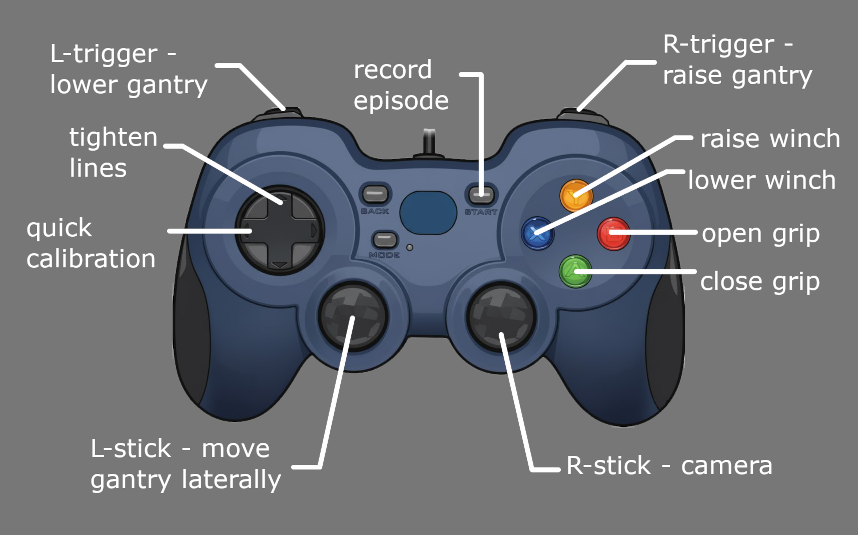
After calibration, you can move the robot around with a gamepad or the keyboard.
Park and Unpark
Unfortunately self-park functionality is still a work in progress.
In order to manually park the robot, use the gamepad to drive it fairly close to the parking saddle, which you can mount on any wall about 2 feet below the level of the anchors. While holding the gripper in one hand, turn off all power to the anchors. the lines should then have some give to them so you can place the gripper on the saddle and gently pull the lines until you can place the gantry on top of the gripper. In this position the lines should be safely out of your way while the robot is powered off.
Learn when to use the kill switch
The "all off" button on the outlet remote serves as a low tech kill switch that turns off all the motorized components. Usually, without power the gripper slowly falls until it touches the floor. It is best to keep the outlet remote in the same place at all times, and circle the "all off" button with red sharpie or nail polish. You could mount it to the wall or the desk for example. That way you don't have to think too hard in the event that you need to hit that button.

"Auto tension" reels in each line until some tension is detected. If a line gets tight but doesn't stop reeling gently tug on it. If that doesn't stop it, hit the "STOP" button in the control panel. The stop button in software commands the motors to keep their current length but doesn't turn anything off. If for some reason motors are still moving after this, hit the "all off" button on the outlet remote. You may need to repeat the tension calibration steps for the misbehaving motor.
Hit the kill switch if the gantry gets too high and the lines are getting too tight, or if you hear a rising "tink tink" sound. Its a dangerous situation that can quickly lead to something breaking. If this happens it is usually a sign that calibration needs to be improved, but can also becaused by anchor_server.py crashing while reeling in.
Hit the kill switch if someone becomes entangled in the lines. But if you can't reach it, You can pull on them till you overpower the motors, which only takes a few kg of force, If any motor is overpowered, the whole system stops. If this ever happens, please let me know of the circumstances so I can try to prevent it.
Both the hardware and software of this system are released AS IS without warranty. See the Apache 2.0 License For more detail.