Raspberry Pi Setup
To be performed for each robot component (four anchors and one gripper) If you purchased a fully assembled robot you do not need to do this.
For pre-imaged cards
When the component boots it will look for wifi credentials using it's camera. Hold up a wifi share QR code to it and it should appear on your network and be detected by the control panel in under a minute.
You can generate a valid wifi share code with qifi.org
Image SD card
Download the Raspiberry Pi Imager
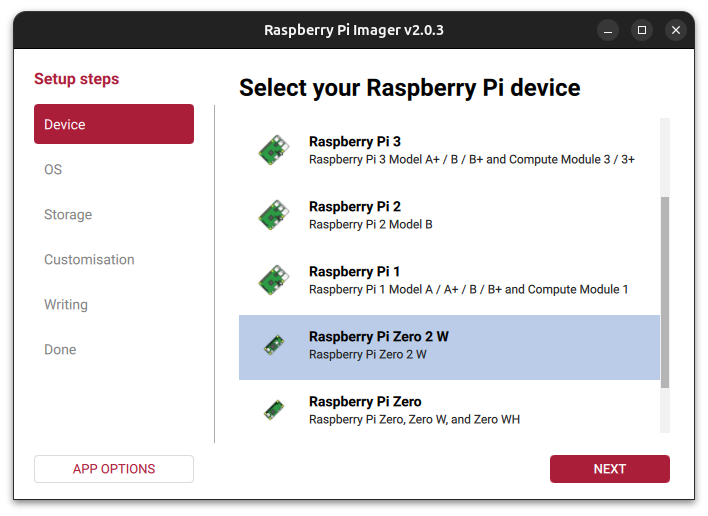
Insert a MicroSD card and open the imager.
For device, select Raspberry Pi Zero 2 W
Download the Stringman Raspberry Pi Image (1.6 GB)
For operating system, select custom image and use the downloaded file.


Click Next and then select the SD card you would like to flash.

Click Write and confirm. When the image is finished, insert it into the raspberry pi of the stringman component and boot.
Configure the wifi with a share code according to the structions in the section above.
Eval tools and component types
The stringman image automatically distinguishes between all component types except the pilot anchor and pilot power anchor. They differ only by the winding constant. If you are assembling components, after assembly you will have to run the corrsponding eval tool, and the argument you pass here sets the type.
Anchors: qa-anchor anchor|power_anchor
Grippers: qa-gripper
These tools walk you through each sensor and stop if one isn't responding. At the end, they wind the correct amount of line on the spool so be prepared for that.
Updates
At this time it is only possible to update by logging into each component. In the configuration.json file where your robot's details are saved,
stringman-headless will have written all of their id addresses. ssh into each one.
ssh pi@<component-address>
the password on the default stringman image is Fo0bar!!
/opt/robot/env/bin/pip install --upgrade "nf_robot[pi]"
Setting a different wifi network
At boot if none of the saved wifi networks can be connected to, the device will go into QR code checking mode with it's camera. Just hold up a new code.
If that doesn't work in your scenario, insert the Micro SD card from a robot component in your PC. Confirm it is mounted at /media/$USER/rootfs run the following command from the cranebot3-firmware repo
sudo ./add_wifi_config.sh "SSID" "password"