Usage Guide
For installation and startup, refer to Desktop Setup Guide
Connecting
Whether starting the control panel first, or powering on the robot components first, the control panel should discover and connect to every component automatically. The status of the connection to each component is displayed above it.

After making the initial connection to a component, the control panel will attempt to connect to the video stream as well. The status of all video stream connections is indicated in the bottom left. An unconnected video stream is indicated by a hollow monitor icon, and a connected stream is indicated by a filled monitor icon.

If some components don't connect, please refer to the Troubleshooting page. Or ask for help on our Discord.
Status bar
The bar at the bottom of the screen shows various system health measurements such as video latency and error messages.
The STOP button can be pressed at any time to cause a soft stop. this means any task which is generating motion commands will be cancelled and all motors will be commanded to stop. After a soft stop the robot can continue to move again as soon as any task or control input is given.

Main menu
- Change system mode
- Calibration
Calibration
Print out the full-page "origin" marker at 100% scale with no margins. Tape the page to something completely flat such as a large book, a pane of glass, or an un-damaged peice of cardboard. Lay the origin marker in the center of the room.
Select the "Full Auto Calibration" option from the main menu. The robot should move to a variety of locations around the room collecting data. After this process is complete, the system should have decided where it thinks the anchors are mounted and will update their locations in the UI. If anything looks drastically wrong, try repeating the calibration with better lighting.
You should be able to judge the quality of the calibration by moving in straight lines. WASDQE keys move the gantry and RF raise and lower the winch. With good calibration, the gantry should move in straight lines. Poor calibration usually causes it to move in an ascending arc, with some lines becoming slack in the process.
At any time, you can run the quick calibration which tightens all lines and resets the internal counter on the line length based on visual observation. Quick calibration only takes a few seconds. This can fix slightly slack lines, but cannot fix excessive errors in the position of anchors. Quick calibration also attempts to reset the length of the winch line using the time between recent gantry swings. The gantry is almost always slightly swinging, but if it's not swinging at all, this part will not be updated.
Tip
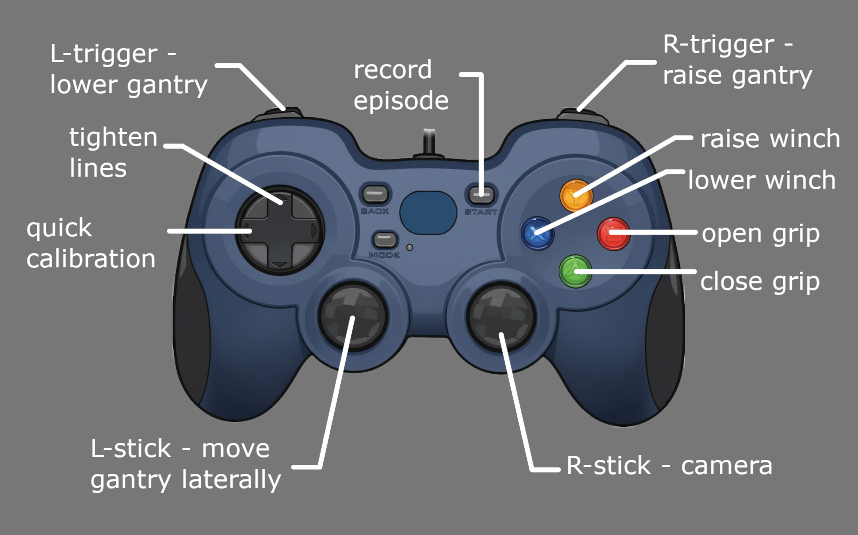
Left D-pad on the gamepad performs quick calibration.
If automatic calibration absolutely cannot determine the true position of the anchors in your room, you can edit them manually in configuration.json at the root of cranebot3-firmware. Units are in meters. The control panel will not alter them unless you run full auto calibration again.
Robot components
The interface shows the position of each robot component and the lines that connect them. Each anchor has a switch inside used to detect whether a line is tight and the this is indicated in the control panel by either drawing the line as straight or curved. if the line is not tight, it is not possible for us to know by how much, thus the amount of curve drawn has no bearing on what it may look like in reality.
Any component can be clicked on to open a context menu with more information pertaining to that component.
You can show and hide the video feed from that component with the video feed button. When showing the anchor video feeds, they are rendered in space from the perspective of that anchor and are on billboards that are invisible from the back face so you may have to orbit your camera to see them.
You can also manually reel in or out any line from the component's context menu.
Diagnostics
Visual detections of the gantry are rendered as white cubes. any time a new detection is made from any camera, a cube is added. These are the detections referred to by the "detections/sec" stat in the bar at the bottom.
If cameras are connected but no detections are made, the robot may just be too high to be in view of any camera, or too far down in the corner of the room. It may aslo just be too dark. The control panel will still try to make an estimate of it's position from last known line lengths, but if this estimate is wrong, you may just have manually move the gantry into a spot where the cameras can see it and then perform a quick calibration.
The distance detected by the laser rangefinder on the gripper is indicated with a red rectangle. You should expect to see this near the floor if calibration is accurate.
Gamepad Operation
Any HID gamepad connected to your computer should be recognized by the control panel. To show the gamepad controls, select the option in the main menu. There is no method of re-mapping them right now.
Seat orbit mode
Lateral motion from the gamepad is performed relative to the point where the user is assumed to be sitting. left/right orbits the user and up/down moves closer or further from the user. currently this point is a hard coded constant in ursina_entities.py but there is an open issue to determine the user's position in the room with an apriltag.
Open and close the gripper by holding either the A or B button respectively.
AI Control
All lerobot integration is accessed via the "train" mode. Including inference. this is liable to change in the future. First calibrate the robot and confirm you can move it normally with the gamepad. then put the system in train mode. this starts an RPC server which external lerobot scripts can connect to.
In another terminal, from the cranebot3-firmware root, activate the same virtual env, and log into huggingface
source venv/bin/activate
huggingface-cli login
Start recording episodes with
python -m trainer.stringman_record_loop
Teleoperation must be performed with the gamepad. begin and end an episode with the start button on the gamepad. To end all recording, either close the control panel, or end the recording script with ctrl-c
To perform inference with a model
python -m trainer.stringman_run_policy
AI based control of Stringman is currently in a very early stage of development. This interface is not polished and relies on some hard coded constants at the moment, but if you are using it, please do not hesitate to send me a message directly on discord and I'd be happy to help.